Water Makeover

https://www.pinterest.com/pinkpixieforest/ice-ice-baby/

Before...

After!!
https://www.pinterest.com/pinkpixieforest/ice-ice-baby/


How my Ice Obsession began...
I started making my own ice about two years ago when the icemaker on my "fancy fridge" decided for the last time to just stop working.  It was the brand that is known for it's repairmen having nothing to do because their machines never break... RIIIGHT!

Being without my cherished icemaker put me into a sort of panic attack- I was pretty much addicted to holding my glass up to the lever and filling it to the brim with ice in whichever form I desired- cubed, crushed or chipped.  After a few weeks,  I guess my husband got tired of bringing home bags of ice and one day told me "just make it"!

At first I think I actually got a bit miffed at the thought of making ice!  But then when I actually thought about it a bit, I realized that making ice was a lot better than buying it or getting it easily from the fridge door.
By making it, I could make sure that the water used was clean and filtered.  I am pretty sure that the ice bought in bags was probably just plain tap water, and who knows how clean or dirty the plant and machines are??
 Looking back, I can't even fathom that I actually didn't want to make ice!


I remember as a child always having ice trays in the freezer- the metal ones that had a "Quick release handle"! lol
Back to the pretty Ice Cubes!
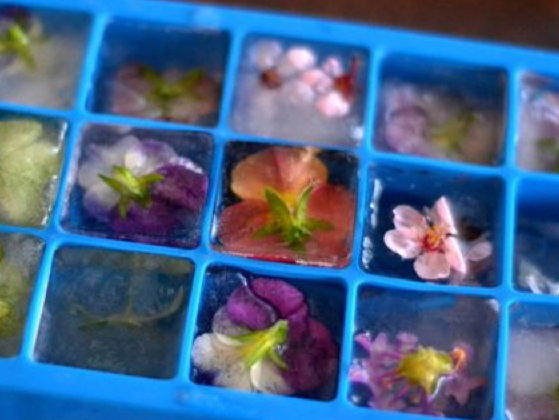

https://www.pinterest.com/pinkpixieforest/ice-ice-baby/
 Here are some tips on how to make crystal clear ice cubes with beautiful blossoms thanks to Food.com, and beautiful Flower Cube Pics from http://theviewfromgreatisland.com

Ingredients 

  • fresh edible flowers (such as scented geraniums, nasturtiums, violets, rose petals, pansies, lavender, borage, basil, chive)
  • 1 12 cups water, boiled and cooled
  • ice cube tray

Directions

  1. Gather and gently rinse all of your pesticide-free blossoms.
  2. Boil water for 2 minutes for all the air trapped in the water to escape. Then leave to cool till room temperature. This will ensure that the ice cubes are crystal clear.
  3. Place each blossom at the base of each individual compartment within an ice tray (or more trays if you have a large party).
  4. Fill each compartment half full with the cooled boiled water and freeze.
  5. After the water is frozen solid, fill each ice cube compartment the rest of the way to the top with the remaining boiled water.
  6. Refreeze and allow it to remain in the freezer until you are ready to use them (store in the freezer in zip lock bags).
  7. NOTE: You can also freeze a large ice ring for the punch bowl, with a variety of blossoms. Don't use the glass punchbowl or it will expand and burst in the freezer. Instead, use a ring-shaped cake tin and fill it with flowers and water. Follow the same procedure as above (filling halfway, then freezing), but you can add additional blossoms to the second layer so that the blossoms are throughout the large ice ring.
  8. Use the ice cubes in pitchers or glasses of lemonade, iced tea, juices, punches and cocktails

https://www.pinterest.com/pinkpixieforest/ice-ice-baby/
Linking with http://betweennapsontheporch.net/,

http://howsweetthesound.typepad.com/

Fun Homes for Houseplant Cuttings!

Hello my sparkly friends!
I thought I would share my way of making use of cloudy antique crystal and growing houseplant cuttings at the same time.
I adore going to yard sales and thrift shops, and many times I find crystal that is gorgeous but a bit cloudy or maybe it has a chip or two which makes it unsuitable for the table.   Well, instead of passing them up, I adopt them and fill them with either fresh cut wildflowers or turn them into sparkly mini planters!  Here are a few pics


 Thank you so much for stopping by, and please leave me a comment to show me how you use your crystal! xoxo Tobi and the Pixies

DIY Copper Vessel Sink


Hello my friends!  Here is a post from a few years ago on my other blog.  I thought it would fit better here. Hope you enjoy!!

It all started with our house fire back in 2007. Click here for a different post on that.
The house was stripped down to the beams, so I moved walls, vaulted ceilings etc.... don't worry, it was all good! 
 Anyway, I had to order two sinks for the bathrooms. I ordered one, and thought I had plenty of time to order the other. Boy was I wrong- The contractors needed them both at once of course! The sink I had ordered for the Powder room fit better upstairs so I was left without a sink! I had seen pictures of a tin bucket in a magazine, so when the project manager asked me for the powder room sink, I handed him this bucket and said
"Here ya go!" He looked at me as it I had two heads, but he was finally getting used to my unorthodox decorating style.
"What am I supposed to do with this?" he asked, not really wanting to know my answer.
"Oh, just drill a hole in the center that matches the size hole that sinks usually have and install it".
"You can't do that" he said, obviously he was a linear thinker and
 I was challenging the core of his being...
"Yes you can, right Giuseppe? " I responded cheerfully, and turned to the contractor who loved my wacky ideas cause he knew that it would look great in his portfolio.
He nodded with approval as he whisked off with my copper pot to drill a hole in it.
So, not only did I get the cool sink I wanted, it cost me only $5 because I had the pot that I had paid a whopping $5 for a bunch of years ago! We did a "Rock Area Rug" from the pebble tiles left over from the upstairs shower, so that cost us nothing because we had to buy them for the shower and if I hadn't used them, they would have been in my garage!
The counter top was made from the peice of wood left over from my fireplace mantel, and a chunk of tree that we had to cut down now lives inside and serves as a leg.
Don't you just love THRIFTY decorating???
Another one of my "decorating things" is to paint the walls TWO different colors. In my powder room, two walls are blue and two walls are green! I started doing this when I couldn't decide which color I liked better, so I decided on both. Who says you HAVE to paint all the walls the same color? Rules schmules I say!
Here is the WATER SHOT for Watery Wednesday!!!

I have Japanese River Rocks in the bottom of the sink for an organic feel

Sparkly Hugs,Tobi and the Pixies!

Wedding Planning!!!

I can spend hours and hours looking at galleries of awesome and inspiring wedding DIY pictures !!
Isn't it amazing how we can get so fixated on the beautiful images that hours go by before we remember that dinner isn't cooking itself!
My daughter Ashley is getting married the June 21st in a big tent in my yard with a barbeque.
Here are some pictures from my pinterest board that have me totally inspired!


natural dessert table


I'm Gonna Paint Me Some Punkins!

Hello my sparkly friends!

Don't you wish Halloween Candy looked like this??

 So Miss Beverly and Pinterest inspired me to go get some pumpkins and spray paint them pink-  They are so beautiful that way, Don't you think?
How cute are these stuffed babies?


These pumpkins are actually pink for real- they grow pink... I really have to get some seeds and try them next year!


Please visit How Sweet The Sound for more pinky punkin goodness!


Sparkly Hugs,
Tobi and the Pixies!

Pinspiration for my Fairy House!

Hello my Sparkly Friends!  So as some of you may know, I have been redoing my back yard into a Pink Pixie friendly Forest!  Included in this forest is an art studio inspired by My Shabby Streamside Studio.  I have only just begun, but will keep you posted as to my progress!
In Light and Love and Sparkly Hugs,
Tobi and the Pixies!

Ta Dah!!! Raised Garden Beginnings...and Happy Pink Birthday!

Hello my Sparkly friends!
So It's Pink Saturday's Fourth Birthday-
This is me being pooped after gardening.
Thanks so much for your comments on my raised garden post last week. 

 I decided to go with the spiral bed after all like the one above from Pinterest.
I won't be copying exactly for this one- and it is not finished- this is just the primary blocking and ground clearing.


 I forgot to take a before pic- but just imagine a big jungle of tall weeds all jumbled together!
Today I woke at 5am, and was in the garden by 6.  

This is not typical Tobi I'll have you know. 

 Although I truly love my sleepies- also 

love arising at dawn and being there when the day wakes up.
So that's what i did this morning!  I was tossing and turning all night planning which plants I would move to which place... and in the end I wound up with this!  
Yay!
  I even put all of my tools away-  
instead of leaving the yard 
look like a landscaping truck exploded on it.  

You see- I have ADD and sometimes I go off and start another project before actually finishing the first.  This is not one of my best qualities- but today I made sure to finish what I had started... at least the Phase one of this project!


So Here's What I did:
First I pulled out all of the weeds and trimmed back my Peegee sp? Hydrangea and spreading Rose bush

Then I dug up all of the plants I would be saving: My Sedum, two small Russian Sage plants, a Butterfly Bush that was getting too big for the front bed, my strawberry plants and these yellow fast growing tall flowers that I don't know the name of!
The sedum went at the back of the spiral, The Butterfly Bush went to the left corner behind the spiral, along with the two Russian Sage and Yellow unknown flower not yet in bloom! 
 I put them behind because they grow "like Stinkweeds" (lol my mom used to say that, can't say I even know what a stinkweed is!)

I then placed my fountain in the middle- (Setting that up will be part two)
I hadn't planned for a fountain, it was kind of a spur of the moment sorta thing- but I think the soothing sound of water trinkling will be nice from the porch.
Oh- and I placed a hosta that was hidden under all those weeds at the entrance.
So after all of this work, I took a nice pink bubble bath,
Put on my prettiest Party Dress 

And here I am wishing everyone a pinkaliscious weekend
 and to
 Miss Beverly- 
Thank you so much for getting us all together every Saturday for the past four years!  I have made a lot of friends here and me and the Pixies LOVE YOU!!!
(even if our grammar stinks!)
 
Stay tuned for Part Two- Setting up the fountain and
Part Three: Creating a pebble mosaic walkway!
Ta ta My lovelies!
Sparkly Hugs,

Lovely Raised Gardens!


Hello my sparkly friends!
Well, Mother's Day is officially over... so that means it's time to
 get your plants in the ground if you live in the North East
 like me and the Pixies.

 I really wish sometimes that I lived in a place 
with an extended growing season, but I really DO LOVE having the snow in the winter, even though we had none this year.

So let's talk about raised gardening. 
 I have a side lawn that has full sun in my front yard 
(where the  pile of topsoil with weeds
 growing on it that became known as the
and had my husband threatening me with Preen when i wasn't looking to get rid of the weeds  to  stop the neighbors from whispering about us) 

 is located.
The great lesson it taught me is to buy topsoil only in bags,
Especially if you are planning to grow veggies in your raised bed because the bulk topsoil comes from various locations and you have no idea what kind of pesticides and chemicals it contains!
 So I am planning to create raised beds in which I will raise lots of vegetables

and decorate with flowers so they will be pretty too!
I was planning on making rectangular ones like this

and lining them with chicken wire on the base so I don't have to worry about burrowing critters, and will use white pebbles in between and around the beds.
Then I will make a pretty flower bed close to the curb.
Easy Peasy- right??
But I really keep falling in love with the circular ones...
Help me choose!!!

The images I used in this blog are from Pinterest
 If you would like the source
visit my Pinterest board
 "Raised Gardens" 
Linking to
Pink Saturday
Outdoor Wednesday 
Pink Saturday
NiftyThriftyTuesday
Ivy and Elephants

Instant Forest Walkway or Outdoor Room Floor!


"Making Foot-paths out of nothing at all... out of nothing at all..." (Sung to the tune of "making love out of nothing at all")

Hello my sparkly Friends! Continuing work on the labyrinth, I started getting bored with the same ol' "Rock*Brick*Gravel theme and thought I would mix it up a bit! I want this side of the Labyrinth to lead to a "Garden Room" and I wanted something prettier for the floor. After googling how I could grow moss with beer and buttermilk, I decided I just don't want to wait that long for moss to grow!
So I came up with a thrifty streak of green genius! First, lay your main floor/walkway rocks. Then we are going to transplant hardy grasses and moss to fill in the cracks and look like it has been there for years using my simple technique!
This idea came to me while being scolded by the hubs that "Sod needs full sun to grow it's going to die!" when he saw my $5.00 patch of Home Depot sod that I decided looks a bit "too perfect" for my taste. It is like the metrosexual of the plant kingdom. It's way too well groomed. So perfect it's creepy (like a guy with a manicure and shiny nails! EEWWW) It's like grass that really needs to address it's "grassuality" and decide if it is really grass or not. Poor confused sod. You belong on a golf course. With Tiger. Nuff said about that. I actually like golf by the way so don't think I am judging!

So my brilliant and "muy" (that's spanish for "very") THRIFTY idea was to search out sod's unrefined redneck cousin... Crabgrass, who everybody knows is the bad guy at the lawn party who is not afraid to kick green butt of any plant naive enough to think it can grow close to him.
Yep- this is what I'm talking about!

Search out a nice, firm, ruggedly handsome clump of crabgrass, and carefully pull him up by his roots.
Take your scissors, and give him a brazilian.
Then you can artfully plant him in between your rocks! Try and mix up grass varieties and textures.

Then you can fill in the gaps with moss that you must have growing somewhere on your property.

Continue this until you have the desired size walkway or floor.
I am not nearly finished yet as you can see!

So there you have it! My nice, green shade loving MACHO SOD that will grow even if I forget about him. You can't beat that! If only husbands were more like sod.... Ha! The GRASS is always greener... you know the rest! LOL!

Jack, do you never sleep ---
does the green still run deep in your heart?
Or will these changing times,
motorways, powerlines,
keep us apart?
Well, I don't think so ---
I saw some grass growing through the pavements today.
Ian Anderson


Sparkly Hugs,
Tobi and the Pixies